Pods
1. Introduction
Pod作为k8s中的最小可部署单位, 其中可包含一个或多个container. 但一个pod中的container不可以处于不同nodes中.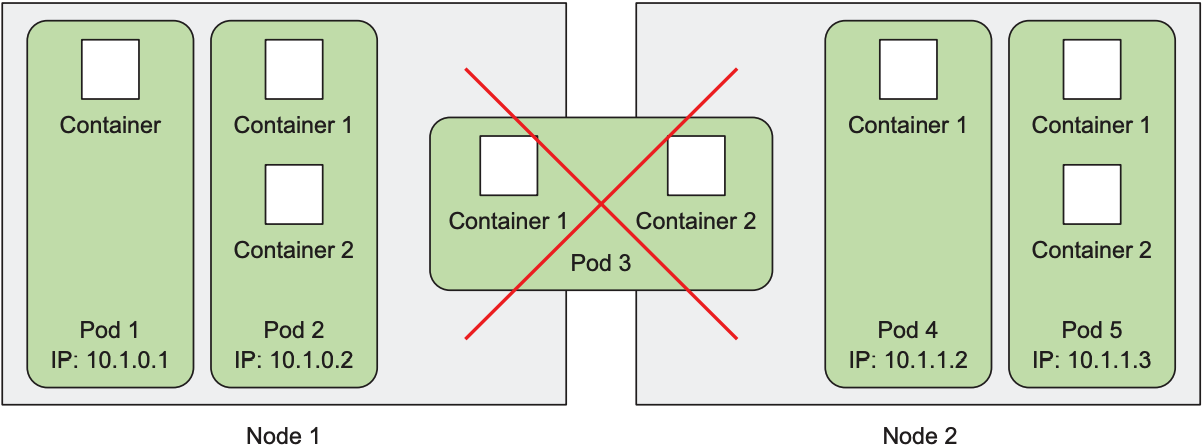
K8s中, Pod, Container和Node的区别如下:
- Container: 表示一个独立的应用程序及其依赖
- Pod: 作为k8s中的一个抽象概念, 表示项目中最小的逻辑单元, 其中可包含一个或多个container, 且每个container拥有不同的功能, 并共同组成一个服务
- Node: 表示一个物理机器或虚拟机
1.1 Why we need pods
乍看之下container与pod存在功能重叠, 似乎并没有必要使用pod, 但pod为container做了一层必要的封装:
- container内的进程间通信需要开发者自行维护; pod内的container共享UTC namespace和network namespace, 可通过localhost connection与其他container直接通信
- container内的进程崩溃时, 开发者需要某种机制检测崩溃并重启; k8s提供一整套pod重启机制(restart policy, liveness probe, backoff delay, backoff reset等)来重启pod中崩溃的container
- container内进程的日志需开发者自行维护; k8s可查看pod内所有container的日志, 也可单独查看pod内某个container的日志
- container内进程共享同一文件系统, 容易导致文件操作冲突; pod内的container拥有各自mount namespace, 因此container的文件系统相互隔离
1.2 How containers share the same IP and port
一个pod内的所有container共享一个loopback network interface, 因此需避免多个container使用一个port; 不同pod内的container不存在该问题, 因为每个pod拥有各自的network namespace.
一个k8s cluster内的pod可通过以下方式相互通信:
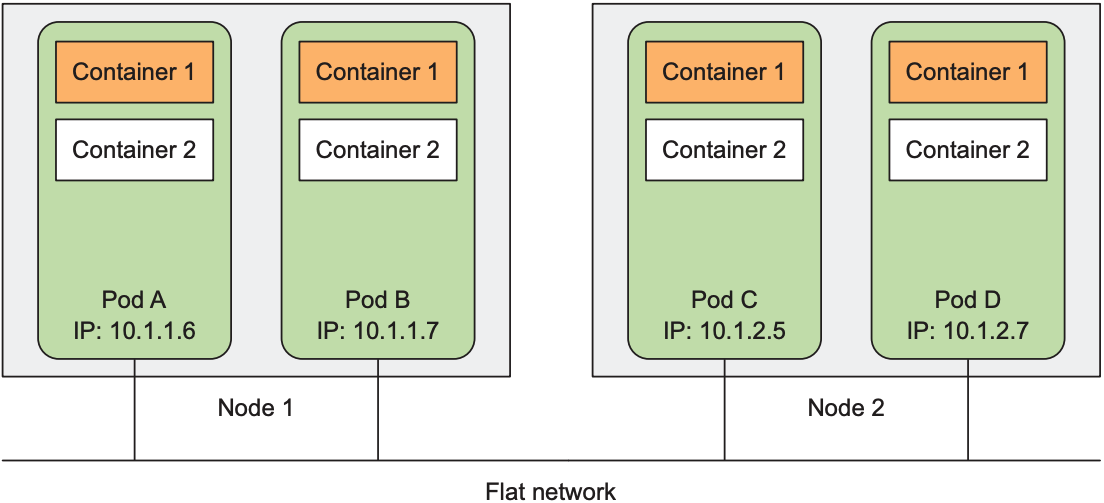
- IP address: 每个pod拥有独立IP address, 可直接向pod对应的IP address发送信息. 即使pod位于不同node, pod的IP address也不会重复.
- Service: 表示一组拥有相同功能的pod集群, pod可直接向service发送信息, service会进行负载均衡, 并将消息发送给其中一个pod
- DNS Resolution: k8s提供一个内置的DNS server, pod和service都可拥有自己的hostname, 让通信更轻松
1.3 Organize containers across pods properly
K8s允许在单个pod中运行多个container, 但并不提倡这种做法: k8s无法水平拓展container, 同一pod中container的水平拓展会被绑定到一起. 假设pod中包含一个frontend container和一个backend container, 由于大部分情况下后端的压力更大, 需要比前端更多的container, 因此应将frontend container与backend container放置到不同的pod中.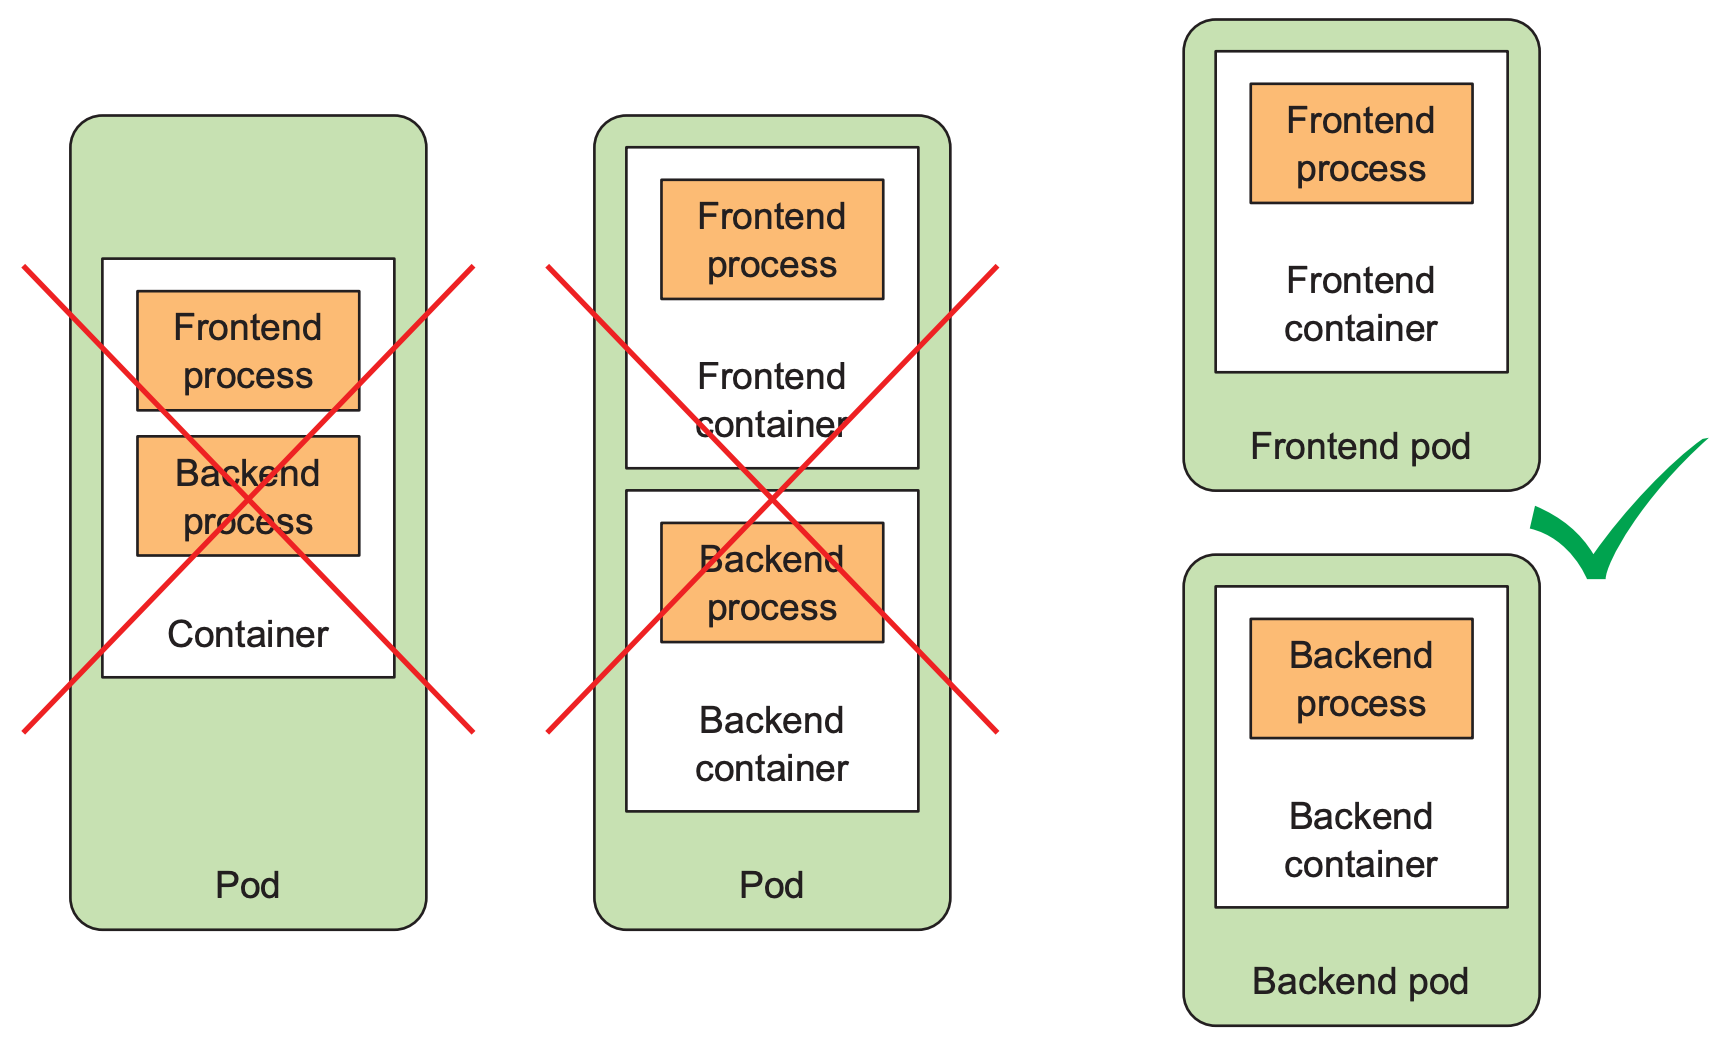
通常一个pod中放置多个container是因为一个主体container需要一个或多个辅助container. 例如, web server需要一个downloader定期从外部下载所需资源, 或者log rotator, data processor, communication adapter.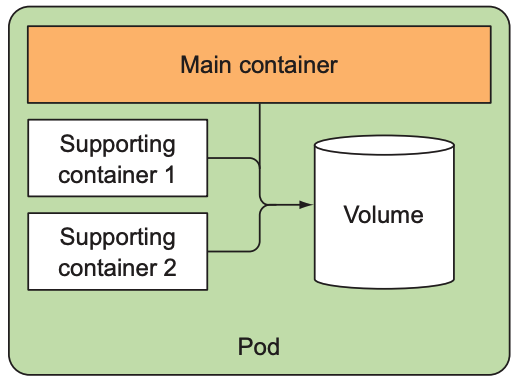
以下是判断pod中是否放置多个container的标准:
- containers是否可以运行在不同的pod中?
- containers是否呈现为单个组件
- containers是否作为一个整体被scaling
2. Create pod from YAML or JSON descriptors
2.1 YAML descriptor of an existing pod
执行kubectl run可通过YAML或JSON文件创建一个全新的pod. 执行kubectl get pod ... -o yaml可获取该pod的YAML文件定义.
$ kubectl get pod kubia-zxzij -o yaml |
Pod definition主要由三个部分组成:
- metadata: name, namespace, labels和pod的其他信息
- spec: 对pod中内容的描述, 例如containers, environment variables, scheduler, volumes等信息
- status: pod当前运行的信息, 例如container的状态, pod的IP等信息
Pod definition中的port是纯粹的信息提醒, 并不具有强制力, 因此其他pod仍可向未定义的port发送信息, 该pod也可通过其他port与外部通信.
2.2 Use kubectl create to create the pod
kubectl create可根据YAML文件创建pod, kubectl get pod会以YAML或JSON形式显示pod definition.
$ kubectl create -f kubia-manual.yaml |
kubectl get pods可列出所有当前正在运行的pods.
$ kubectl get pods |
2.3 View application logs
通常放入container的程序应将日志直接输出到stdout或stderr, 而不是写入某个log文件中, 这样可以更加方便地浏览日志.
- container runtime(如Docker)会将stdout/stderr直接存入文件中(如
/var/lib/docker/containers), 执行docker logs可查看container日志.$ docker logs <container id>
- Kuberbetes可调用
kubectl logs查看某个pod的log$ kubectl logs kubia-manual
- 若pod中包含多个containers, 可添加
-c <container name>来输出指定container的log$ kubectl logs kubia-manual -c kubia
2.4 Send requests to the pod
Pod间的通信有多种方式实现, 最常用的方式是执行kubectl expose来创建一个service, 另一种方式是port forwarding. 执行kubectl port-forward可实现本机local port与pod的port的映射(例如: 将本机port 8888映射到pod的port 8080):
$ kubectl port-forward kubia-manual 8888:8080 |

3. Organize pods with labels
通常情况下, pod的数量会随着工程规模增加而变多. 对于一个microservice architecture, microservice的种类很容易达到20个以上; 由于不同版本的microservice可能包含不同的pod, 单个pod也可能被水平拓展, 从而导致pod数量达到上百个, 因此如何管理pod成为一个问题: k8s使用labels统一管理pods.
3.1 Introduction of labels
Label以key-value的形式挂在resource上. 需要使用部分resource时, 可使用label selectors来筛选resource. 每个resource可有一个或多个label, 且label可被修改, 添加和删除. 例如: 现在我们有一个pod defintiion名为kubia-manual-with-labels.yaml, 其拥有两个labels:
apiVersion: v1 |
执行kubectl create -f kubia-manual-with-labels.yaml创建pod, 执行kubectl get pods --show-labels显示pods上的所有labels
$ kubectl get pods --show-labels |
或添加-L指定一个或多个label:
$ kubectl get pods -L creation_method,env |
3.2 Modify labels of existing pods
k8s允许用户随时添加或修改pod的label.
- Add a label to pod
$ kubectl label pods kubia-manual creation_method=manual
pod "kubia-manual" labeled - Change the existing labels, using "--overwrite" option
$ kubectl label pods kubia-manual-v2 env=debug --overwrite
pod "kubia-manual-v2" labeled
4 List subsets of pods through label selectors
Label selector可通过以下方式筛选resource:
- label的key为指定值
- label的key为指定值, 且label的value为指定值
- label的key为指定值, 且label的value不为指定值
以下是label selector使用的方法:
- List all pods with specified key and value
$ kubectl get pods -l creation_method=manual
NAME            READY STATUS  RESTARTS AGE
kubia-manual    1/1   Running 0        51m
kubia-manual-v2 1/1 Running 0 37m - List all pods with specified key
$ kubectl get pods -l env
NAME            READY STATUS  RESTARTS AGE
kubia-manual-v2 1/1 Running 0 37m - List all pods without specified key
$ kubectl get pods -l '!env'
NAME         READY STATUS  RESTARTS AGE
kubia-manual 1/1   Running 0        51m
kubia-zxzij  1/1   Running 0        10d
除上述方式外, label selector还支持一下方式筛选pod:
creation_method!=manual: 筛选所有creation_method不为manual的podenv in (prod,devel): 筛选所有env为prod或devel的podenv notin (prod,devel): 筛选所有env不为prod且不为devel的pod- 上述方式可用comma(逗号)组合, 例如:
app=pc, rel=beta
5. Use labels and selectors to contrain pod scheduling
当pod被创建后, k8s会将其随机分配到cluster中的一个node. 但由于node并不是相同配置. 大部分情况下我们不需要对pod的分配做任何干预, 因为每个pod会获得所需的计算资源(CPU, 内存, 存储空间等); 但某些情况下可能需要手动分配pod, 尤其当node的硬件配置不一致时: 例如, 一个k8s cluster中一些node使用HDD, 另一些node使用SSD, 我们希望保证磁盘访问频繁的pod(如数据库应用)分配到使用SSD的node.
除了pod, k8s允许向node添加label, 并在pod definition中指定node的label.
5.1 Use labels for categorizing worker nodes
$ kubectl label node gke-kubia-85f6-node-0rrx gpu=true |
然后在pod definition的YAML文件中添加node selector:
apiVersion: v1 |
运行该YAML文件时, pod会自动分配到拥有GPU的node上运行. 当然, 也可以将pod直接分配到某个node, 因为每个node都有一个唯一的label. 该label的key为kubernetes.io/hostname, label的value为kunode的hostname. 若在nodeSelector中使用该label, 则pod会与该node绑定; 若该node不可用, 则无法生成pod.
6.Annotate pods
除了labels, pods和其他k8s资源还拥有annotations. Annotations也以key-value形式存在, 但它并不负责管理resource, 而是用于说明resource, 例如: 创建该resource的用户姓名.
- Look up an object's annotations: Annotation无法单独获取, pod definition或kubectl describe包含annotation.
- Add and modify annotations: kubectl annotate可为对应resource添加annotation; 或key相同, 则覆盖value.
$ kubectl annotate pod kubia-manual mycompany.com/someannotation="foo bar"
pod "kubia-manual" annotated
7. Use namespaces to group resources
Label作为一种管理k8s资源的方法十分有效, 但存在以下问题:
- 查看资源时, 每次都需在命令后添加对应的label, 否则会看到所有资源
- 由于一个资源可以拥有多个label, 因此资源间会出现大量重叠label
总结来说, label只做到资源分组, 并不实现资源隔离, 因此k8s提供了namespace来隔离资源.
7.1 Introduction of namespace
Namespace可将资源隔离为不同group, 通常会按照开发环境来划分namespace(dev, stage, prod). 需要注意的是, 并不是所有资源都有namespace, 例如node, 这类资源称为cluster-level resource, 因此不能存在同名资源.
$ kubectl get ns |
若不指定namespace, 则kubectl默认在default的namespace下操作. 除了default之外, k8s会创建其他namespace. 若需要使用其他namespace下的resource, 可使用--namespace指定某个namespace
$ kubectl get pods --namespace kube-system |
需要注意的是, namespace提供的隔离性只面向user, 并不面向任何object. 例如, 现在k8s cluster中有两个namespace, 分别名为foo和bar, 用户在foo中查询的任何资源都只属于foo; 但若foo中的某个pod知道bar中某个pod的地址, 其仍可以向另一个namespace中的object发送信息.
7.2 Manage namespace
Namespace与其他资源一样, 都可通过kubectl命令或YAML文件创建.
- 使用YAML或JSON文件 使用kubectl将YAML文件发送给K8s API server:
apiVersion: v1
kind: Namespace
metadata:
name: custom-namespace$ kubectl create -f custom-namespace.yaml
namespace "custom-namespace" created - 使用
kubectl create namespace$ kubectl create -f kubia-manual.yaml -n custom-namespace
pod "kubia-manual" created
7.3 Manage resource in other namespace
若需要在其他namespace中创建资源, 可通过--namespace(或-n)或在metadata.namespace中指定namespace.
- 执行kubectl命令时指定namespace
$ kubectl create -f kubia-manual.yaml -n custom-namespace
pod "kubia-manual" created - 在YAML文件中指定namespace
apiVersion: v1
kind: Pod
metadata:
  name: my-pod
  namespace: test
spec:
  containers:
  - name: my-container
    image: nginx
8. Stop and remove pods
- Delete a pod by name k8s会终止名为
$ kubectl delete pod kubia-gpu
pod "kubia-gpu" deletedkubia-gpudepod中所有的container: k8s向container中的所有进程发送SIGTERM并等待一定时间(默认为30秒), 若进程没有在指定时间内关闭, 则向其发送SIGKILL以实行强制关闭. - Delete pods using label selectors
若需要删除多个pod, 可使用label selector筛选.$ kubectl delete pods -l creation_method=manual
pod "kubia-manual" deleted
pod "kubia-manual-v2" deleted - Delete pods by deleting the whole namespace
若需要删除某个namespace中的所有pod, 可直接删除该namespace, k8s会自动删除该namespace中所有pod.$ kubectl delete ns custom-namespace
namespace "custom-namespace" deleted - Delete all pods in a namespace, while keep the namespace
若只想删除某个namespace, 不想删除namespace, 可使用--all.$ kubectl delete pods --all
pod "kubia-zxzij" deleted - Delete all resources in a namespace
若需要删除namespace中所有资源, 可执行以下命令.$ kubectl delete all --all
pod "kubia-09as0" deleted
replicationcontroller "kubia" deleted
service "kubernetes" deleted
service "kubia-http" deletedall表示所有类型的资源,--all表示某个类型下的所有resource